SerialEM Note: Hidden Goodies
- Author:
Chen Xu
- Contact:
- Date-created:
Nov 21, 2020
- Last-updated:
May 28, 2025
- Abstract
One of the amazing things about SerialEM, to me, is that I almost always find some cool functions and features which I did not use before. It could be also true for some other users, even you might not regard yourself as a novice user. If you see someone using it, you immediately get it. Otherwise, you might not realize that the cool function exists.
In this note, I want to give a few examples to show some of the hidden beauties I like a lot. And I hope you can learn them from reading this note if you don’t know yet. Hopefully, the example list can grow longer with time and more exploration.
Example 1 - delete multiple nav items at once
This might not sound anything special, as you can use the Delete button
on Navigator window easily, and you just click on the button when the item
is highlighted, and you do this multiple time to delete a bunch of items.
However, if you want to delete a series (a lot of points) items that do not
belong to a single group or are only part of a group, this might become a
little troublesome.
Here is a trick - to use SHIFT-D for this: you first click on the first item to be removed and press SHIFT-D, then you click on the last item and press SHIFT-D again; this will remove all the items in the range regardless their group properties.
You might find there are many hot keys available which you did not pay attention before.
https://bio3d.colorado.edu/SerialEM/betaHlp/html/about_mouse.htm
Example 2 - make multiple polygon montage maps at once
Your reaction might be that you already well know how to do this. Indeed, this can be done with steps below:
Open a polygon montage map file via menu Navigator - Montaging & Grids - Setup Polygon Montage.
Add point items to all and each of the montage positions to be acquired, and give them flag “A”.
Navigator - Acquire at points - Acquire Map Image or Montage.
One of the nice key things here is that once the montage map is open and current, the program knows how to make montage for each of the positions. The montage setup dialog is only set once. Because all the items share the same file, there is no need to draw multiple polygons at different locations.
We also do this very often. We collect all the good meshes to make them into montage maps so we can pick and realign to each positions later. However, there are a couple of things we don’t like with this way:
The super-stack file for all the montages can be very large. It is not handy to look at a particular mesh off-line.
The section # of the file is from 0,1… to the last one, they are directly linked with mesh label/numbers.
It would be really nice to make all the meshes to have their own separate files and with the mesh ID in the filenames, something like Grid3-Mesh8.map. This way, we can check each mesh map easily when off-line. On a windows computer with 3dmod installed, this is as simple as double clicking on the filename.
How to do that? Not so easy anymore? If you don’t already know, here is how:
add a polygon item as you normally do.
make sure this polygon item is above of all and any mesh point items you already add. You do this by left mouse dragging the polygin item UP.
Navigator - Options - Use Item Labels in Filenames.
With polygon item highlighted, check the boxes before “Acquire (A)” and “New file at item”.
In the pop-up “Property of File to Open” dialog window, select “Montaged Images”. And check both boxes before “Fit montage to polygon” and “Skip montage setup dialog when fitting in future”.
Input in the pop-up montage setup dialog window.
Input your string, e.g. “Grid3-Mesh” in the filename dialog, click
Save.Now highlight the mesh item you want to make map, check “Acquire (A)” and “New file at item”.
repeat for all the mesh items.
After you do Navigator - Acquire at Point, you will get multiple files such as Grid3-Mesh3.map, Grid3-Mesh4.map, Grid3-Mesh15.map etc.. Very nice, isn’t it?
Here each mesh map will have its own filename. During collection, the filenames are opened and closed for each item. The setup step uses heritage function which is also quite hidden.
Tip
To obtain filename with MapID and ItemID in the filename string, here is a tip:
1ReportNavItem
2NavIndex = $repVal1
3pt_label = $NavLabel
4
5NavIndexItemDrawnOn $NavIndex
6ReportOtherItem $repVal1
7map_label = $NavLabel
8
9filename = $map_label-$pt_label
Example 3 - make snapshot with nav features
We already know SerialEM script has a command to make a snapshot of an image in a buffer and save it in JPG format. But that doesn’t include any nav items drawn or a scalebar. A snapshot function with possibility of including navigator items drawn and a scalebar can be very useful sometimes.
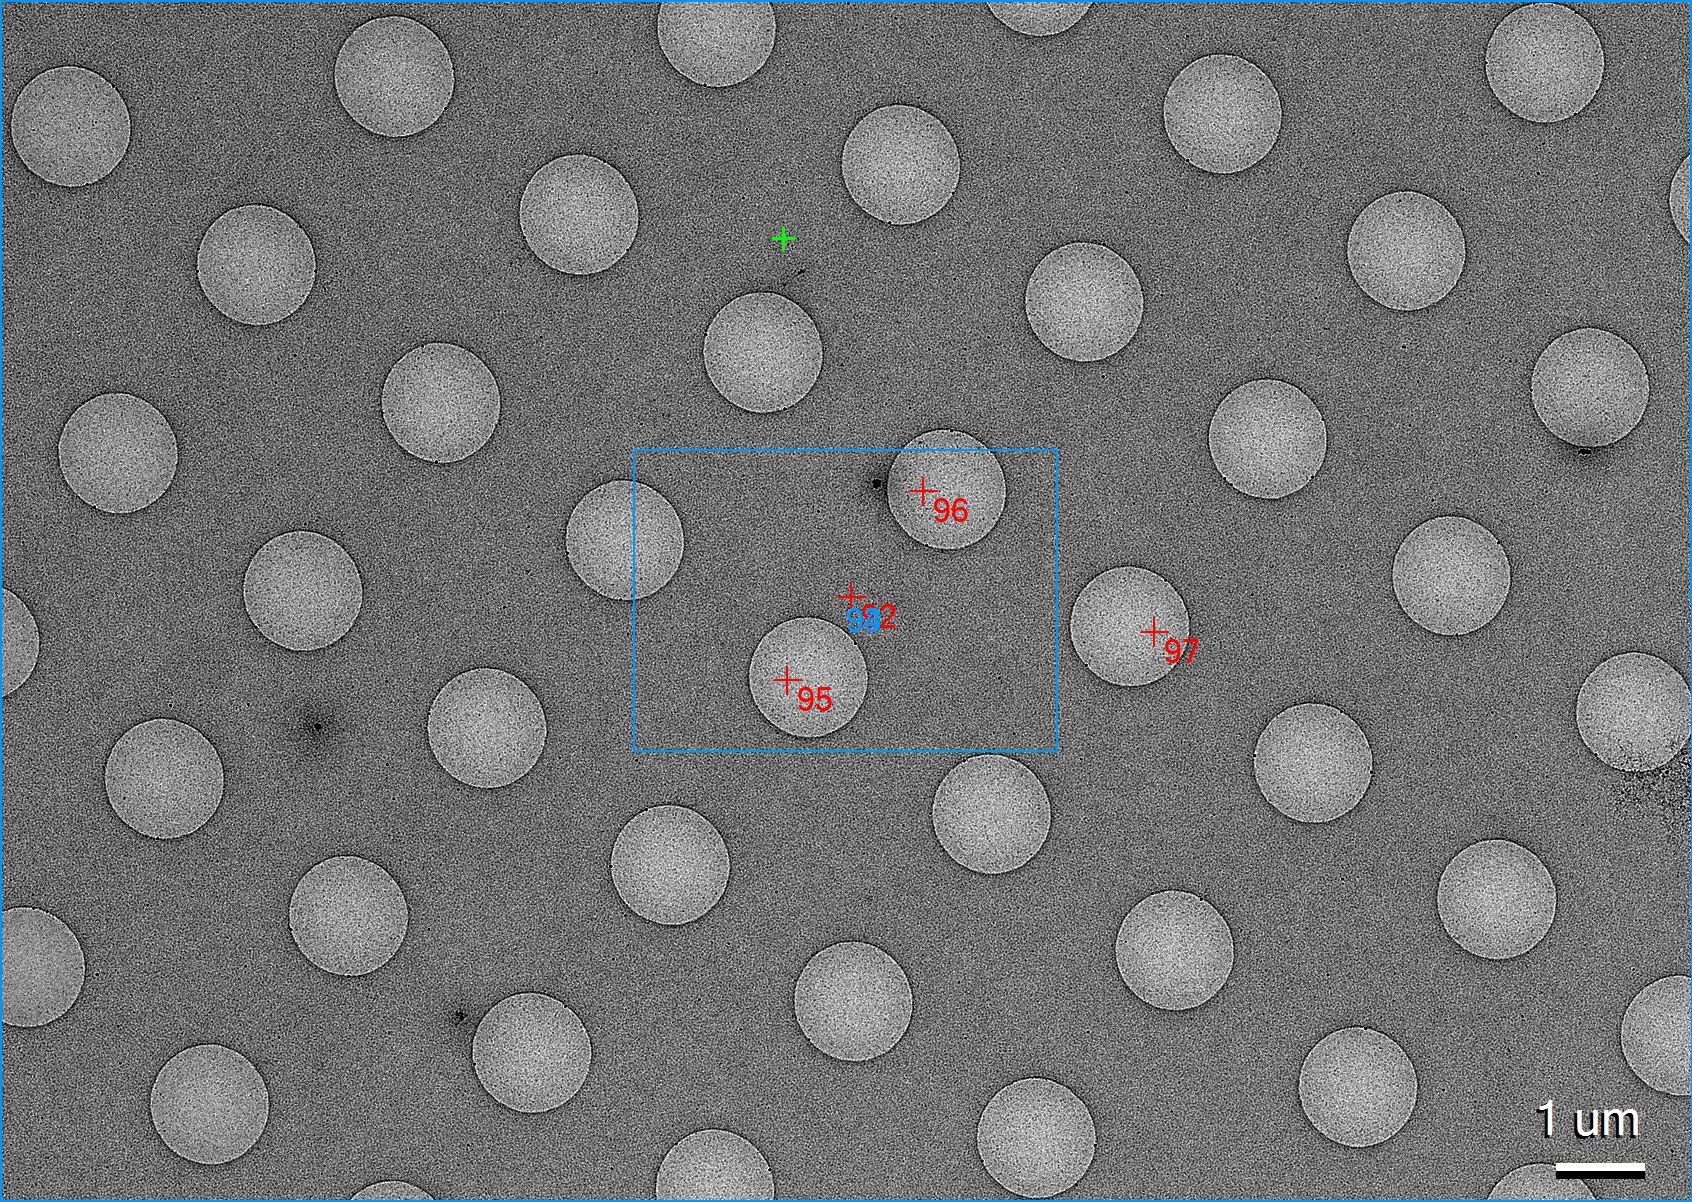
For example, in a screening session, we make a mesh montage map and pick a new point items on the map from different areas. Before or after we take all the images from these point items, it would be really cool to have a snapshot map image with all the points drawn on it. It can be very useful for us to track the image quality with ice conditions etc., because we know which image is from which area in the map.
Something like an image below:
Fig.1 An example snapshot (click for full size image)
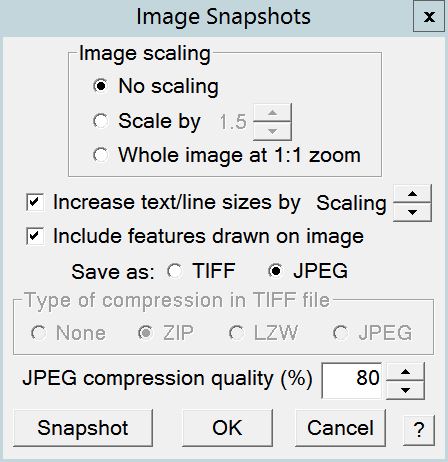
This function has been implemented fairly recently. It has a small GUI tool window and a script command for this task. You can open this tool window from Window - Take Image Snapshot….
Fig.2 Snapshot Tool Window (click for full size image)
There is also a command which can be used like this:
SnapshotToFile 1 1 1 JPG JPG snap.jpg
For more complete information about this little function, please check helpfile section:
https://bio3d.colorado.edu/SerialEM/betaHlp/html/hidd_screenshot.htm
and command usage description.
Example 4 - Run script at SerialEM program start or exit
This is a new feature in 3.9 beta. It can be very handy if you have some tasks to do when you startup and exit. For example, you might want to get into Low Dose mode and clear some persistent variable from last run. Or you have some other tasks to do when you quit SerialEM program.
You can setup it from menu Script - Run at Program Start … or - Run at Program End…, and define a script accordingly. Here I give two examples - one to define current working directory in the startup and one to make sure column and gun valves be taken care of.
Below script running at program start will pop up a file chooser to ask you define the current working directory.
 1ScriptName StartUp
 2# script to run when starting SerialEM program
 3
 4#SetLowDoseMode 1
 5#GoToLowDoseArea V
 6
 7SetDiectory X:\
 8UserSetDirectory
 9Echo -----------
10ReportDirectory
11Echo -----------
12OpenChooserInCurrentDir
Here is my little script to run at end.
 1 ScriptName EndingScript
 2
 3 # script to run when exiting SerialEM program
 4
 5 ReportProperty NoScope noscope           # determine on Dummy or not
 6 If $noscope == 0
 7   ## Close Column/Gun Valves if they are OPEN
 8   ReportColumnOrGunValve
 9   If $repVal1 == 1    # open
10      YesNoBox Column/Gun Valves are OPEN, do you want to Close Them?
11      If $repVal1 == 1 # answer Yes
12        SetColumnOrGunValve 0
13        Echo ------ Now Valves are CLOSED! ------
14      Else
15        Echo Valves are still OPEN!
16      Endif
17   Else
18      Echo Already closed!
19   Endif
20 Endif
The window below will pop up when exiting SerialEM so you will never forget about this.
Fig.3 YesNo Window (click for full size image)
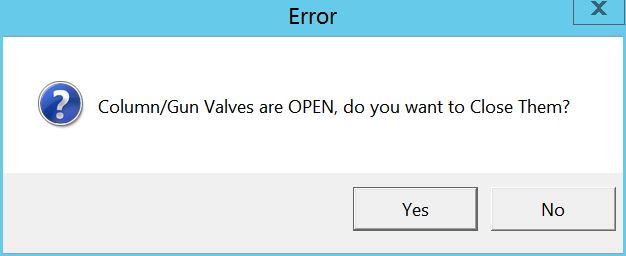
Clicking on Yes will close the valves and No will keep them open.
Example 5 - Scripting With Python
SerialEM Python Code Example
Around March 23, 2021, scripting also supports python. SerialEM native collection of commands act like a module. To enable python support, I have these lines in the property file.
1PathToPython 3.9 C:\Users\xuchen\AppData\Local\Programs\Python\Python39
2PythonModulePath C:\Program Files\SerialEM\PythonModules
3ScriptMonospaceFont  Consolas
4EnableExternalPython 1
Here is an example of the same CycleTargetFocus function in Python code.
 1#!Python
 2#ScriptName CycleTargetDefocus
 3import serialem
 4
 5## function
 6def CycleTargetDefocus(low, high, step):
 7   print('==> running CycleTargetDefocus ...')
 8   print('    ---> low, high, step is ', low, high, step)
 9   tarDef = serialem.ReportTargetDefocus()
10   if tarDef > low or tarDef < high + step:
11      serialem.SetTargetDefocus(low)
12   else:
13      serialem.IncTargetDefocus(-step)
14      serialem.ChangeFocus(-step)
15
16## run it
17CycleTargetDefocus(-1.0, -3.0, 0.1)
Calling Python Script From Regular Script
Around Apr 29, 2021, SerialEM not only got more matured at supporting Python, but also provides functionality to call regular script from a Python script and Vice Versa. The variable’s value can also pass to each other. Below are two example scripts, one in Python and one in regular.
1ScriptName Regular
2a = { 1 2 3 }
3
4echo a = $a
5Call Python
6Echo b = $b
 1#!Python
 2#ScriptName Python
 3import serialem as sem
 4
 5#print('>>> running Python script ...')
 6#sem.CallFunction('Hello::ChangeMag', '', 4)
 7#sem.CallFunction('Hello::SetMagIndex', '', 17)
 8
 9## get a
10ret = SEMarrayToInts(sem.GetVariable('a'))
11#print(ret)
12
13## make reversed a into b
14b = ret[::-1]
15#print(b)
16
17## get b ready for regular
18sem.SetVariable('b',listToSEMarray(b))
Running regular SerialEM script “Regular” by clciking Run button from the editor, the log window prints:
a = 1  2  3
b = 3  2  1
As you can see, it calls Python script “Python”. The array a defined in the regular script is received and convert to python list in the python script. After doing something in Python script (reverse array a in this case), it can get new array ready to be fetched by regular script.
Calling Regular Script and Function From Python Script
One can also do reverse - calling regular script from a Python one and passing values of list variable to from Python to regular script. Look at two scripts below:
1#!Python
2#ScriptName Python
3import serialem as sem
4
5a = [ 1, 2, 3, 4, 5, 6, 7 ]
6sem.SetVariable('a',listToSEMarray(a))
7sem.Call('Regular')
1Echo --- running Regular Script
2Echo $a
Running the “Python” script gives this in log window:
--- running Regular Script
1  2  3  4  5  6  7
Python External Control
You can also use Python Console to control SerialEM process. SerialEM acts as a complete embedded system in this case, and Python is completely external. If you run Python on a different computer from the Windows computer on which SerialEM is installed, you have to build a SerialEM Python Module on your system. Here is an example to build the SerialEM Python Module on a Mac.
$ hg clone http://bio3d.colorado.edu/SerialEM/PythonModule
$ cd PythonModule
$ python setup.py build
Below is screen output when running the python control on the same Windows computer that SerialEM is running on.
PS C:\Users\xuchen> python
Python 3.9.2 (tags/v3.9.2:1a79785, Feb 19 2021, 13:44:55) [MSC v.1928 64 bit (AMD64)] on win32
Type "help", "copyright", "credits" or "license" for more information.
>>> import sys
>>> sys.path.insert(0,'C:\Program Files\SerialEM\PythonModules')
>>> import serialem as sem
>>> sem.ReportTargetDefocus()
-1.600000023841858
>>> sem.ReportMag()
(59000.0, 0.0)
>>> x = sem.ReportMag()
>>> type(x)
<class 'tuple'>
>>> print(x[0])
59000.0
>>> sem.GoToLowDoseArea('R')
Traceback (most recent call last):
  File "<stdin>", line 1, in <module>
serialem.SEMerror
>>> sem.SetLowDoseMode(1)
0.0
>>> sem.GoToLowDoseArea('R')
>>> sem.ReportLowDose()
(1.0, 3.0)
>>>
Below is an example of an interactive Python external control from a Mac.
(base) UMWMLF8LVCJ% python
Python 3.8.5 (default, Sep  4 2020, 02:22:02)
[Clang 10.0.0 ] :: Anaconda, Inc. on darwin
Type "help", "copyright", "credits" or "license" for more information.
>>> import sys
>>> sys.path.insert(0,'/Users/xuchen/tem/SerialEM/build/lib.macosx-10.9-x86_64-3.8')
>>> import serialem as sem
>>> sem.ConnectToSEM(48888,'192.168.1.16')
>>> sem.ReportMag()
(59000.0, 0.0)
>>> sem.GoToLowDoseArea('V')
>>> sem.ReportLowDose()
(1.0, 0.0)
>>>
Here is another example to run a python script on Mac to control a SerialEM running on Windows:
 1import sys
 2sys.path.insert(0,'/Users/xuchen/tem/SerialEM/build/lib.macosx-10.9-x86_64-3.8')
 3import serialem as sem
 4sem.ConnectToSEM(48888,'192.168.1.16')
 5sem.ReportMag()
 6ld = sem.ReportLowDose()        # tuple
 7ld = float(ld[0])               # float
 8if ld == 0:
 9   sem.SetLowDoseMode(1)
10
11## function to cycle LD areas, twice
12def cycleLD():
13    for area in [ 'V', 'F', 'T', 'R' ] * 2 :
14        sem.GoToLowDoseArea(area)
15        sem.ReportMag()
16        sem.ReportLowDose()
17
18cycleLD()
19
20sem.ReportLowDose()
21sem.Exit(1)
22exit()
After saving to a file (CycleLD.py), we can then run it from a typical python environment normally.
$ python CycleLD.py
Embedding a Python Script in Regular Script
We know that both type of scripts can call each other. As things getting even fancier, now we can also embed a Python Script block directly in the Regular Script. Below is an example of that. Assuming there is a Python Script called “PyFuncs”, inside that there is a Python function called “CycleTargetDefocus()”, as mentioned earlier. The example below is to call that Python function directly from Regular script without a dedicated script editor for the python part. The single “hybrid” script gets the job done.
 1ScriptName Regular
 2
 3ArrayDef = {-1. -2.5 0.1}
 4
 5PythonScript $ArrayDef[1] $ArrayDef[2] $ArrayDef[3]
 6#!Python               # cannot have indent here
 7#inlcude PyFuncs
 8
 9a = SEMargStrings      # string list ["-1.", "-2.5", "0.1"] now available
10
11# convert to float
12for i in range(0, len(a)):
13    a[i] = float(a[i])
14
15CycleTargetDefocus(a[0],a[1],a[2])  # defined in script "PyFuncs"
16EndPythonScript
The embedded Python code is bewteen “PythonScript” and “EndPythonScript”. More usefully, we can even pass some of the regular script variables into the Python, by placing arguments after “PythonScript” and a special Python variable “SEMargStrings”. In this case, SEMargStrings has value of a string list [ “-1.”, “-2.5”, “0.1”]. We convert it into real floats so they can be given to the function.
Example 6 - Centering Feature by Right Double Click
SerialEM has various ways to control stage shift and image shift to reach a specific position. However, these usually require multiple actions using the mouse and keyboard. The newly added function that allows the use of a right double-click is a very convenient enhancement. Essentially, if you right-double-click on a target in the image in buffer A or the montage overview in buffer B, it will bring that point to the center of your display.
This feature is somewhat hidden, as there is no script command or menu item for it in the interface. Information about it can only be found in the “Mouse and Keyboard Controls” section of the help file (https://bio3d.colorado.edu/SerialEM/betaHlp/html/about_mouse.htm), as shown below:
Right mouse button double click: Double clicking the right mouse button at a point
in the display for buffer A, or for buffer B with a montage overview, acquires an image
centered on that point; namely, it is equivalent to placing the marker point at that point,
using the Shift P hot key or the Go To Marker button in the Image Alignment & Focus control
panel to center the microscope field of view on that point, then acquiring an image of the
same type as the one being clicked in.  As with those shift operations or dragging with the
right mouse button, image shift will be changed unless the option Move stage for big mouse
shifts is selected in that panel and the shift is above the threshold for moving the stage.
In Low Dose mode, a Preview will be taken if a Record is clicked in; otherwise the image will
match the kind that was clicked in.  The point need not be within the image area; it can be
anywhere in the window.  When stage movement is used, the new image will be aligned with
image shift to bring the clicked point to the center, provided that the point is on actual
image (not the gray area for an image that was mouse-shifted).

Shift - right mouse button double click: Double clicking the right mouse button with Shift
held down will force a stage movement to that position and acquire an image there.
This provides a quick and simple way to move around for X Y.